|
When an Interception event is configured, you must choose an action to be executed when that event occurs. Follow the steps below to do so:
| 1. | You must necessarily have events created. If you don't, see "Creating an Interception Events". Click on "Intercept Off" button, located in the top area of N-Stalker Web Proxy. |

| 2. | A context menu will pop up. You must click on the appropriate action according to the description below: |
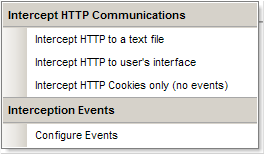
Intercept HTTP to a text file
|
Once an event is found, N-Stalker Web Proxy will save the intercepted data in a text file. You must point a directory location.
|
Intercept HTTP to user's interface
|
Once an event is found, N-Stalker Web Proxy will display data in user's interface, allowing you to modify it before reaching browser or server.
|
Intercept HTTP Cookies only
|
Once an event is found, N-Stalker Web Proxy will search for HTTP cookies available in the communication. If found, they will be displayed to user. This is useful if you want to retrieve a valid session token to be used within a scanning session.
|
| 3. | Once done, you must see a "Intercept On" button instead of "Intercept Off". You can always see what action is configured by bringing the popup menu again. |
|
